Introduction
Not so long ago, I had the idea to turn blog posts into podcast episodes. My first few attempts at this resulted in a manual workflow where the final results would be uploaded to YouTube. The flow was as follows:
- Copy the link to the article from the browser.
- Paste the link into NotebookLM.
- Wait for the audio to be generated.
- See if it was good. Otherwise, tweak the settings and repeat step 3.
- Once the audio was good, download it to my laptop.
- Next, use Headliner to create a video from the audio and upload it to YouTube.
Needless to say, there was a lot of waiting involved in this process. After doing this a couple times, I thought it would be interesting to try and automate it in some way.
In this post, I’ll walk through building podcast-it — a Cloudflare Worker that can take a blog post and return a playable audio file — and share the early decisions, setup, and challenges along the way.
Choosing the Tech Stack
The main limitation was obvious right away: NotebookLM doesn’t have an API, so there was no way to automate against it. That meant I’d have to recreate the key functionality myself — from generating the narration script to producing the audio.
Since my site already runs on Cloudflare, using Cloudflare Workers felt like a natural fit:
- They run close to users, so responses are quick.
- The free tier is generous enough for small projects.
- I could experiment with Workers beyond static site hosting.
For the audio generation, I chose OpenAI for both text generation and text-to-speech synthesis. For storage, Cloudflare’s R2 handles the audio files, and D1 stores episode metadata.
Because the Worker would eventually need to integrate with my blog, I built it as a REST API from the start — making it easy to call from my site or any other client.
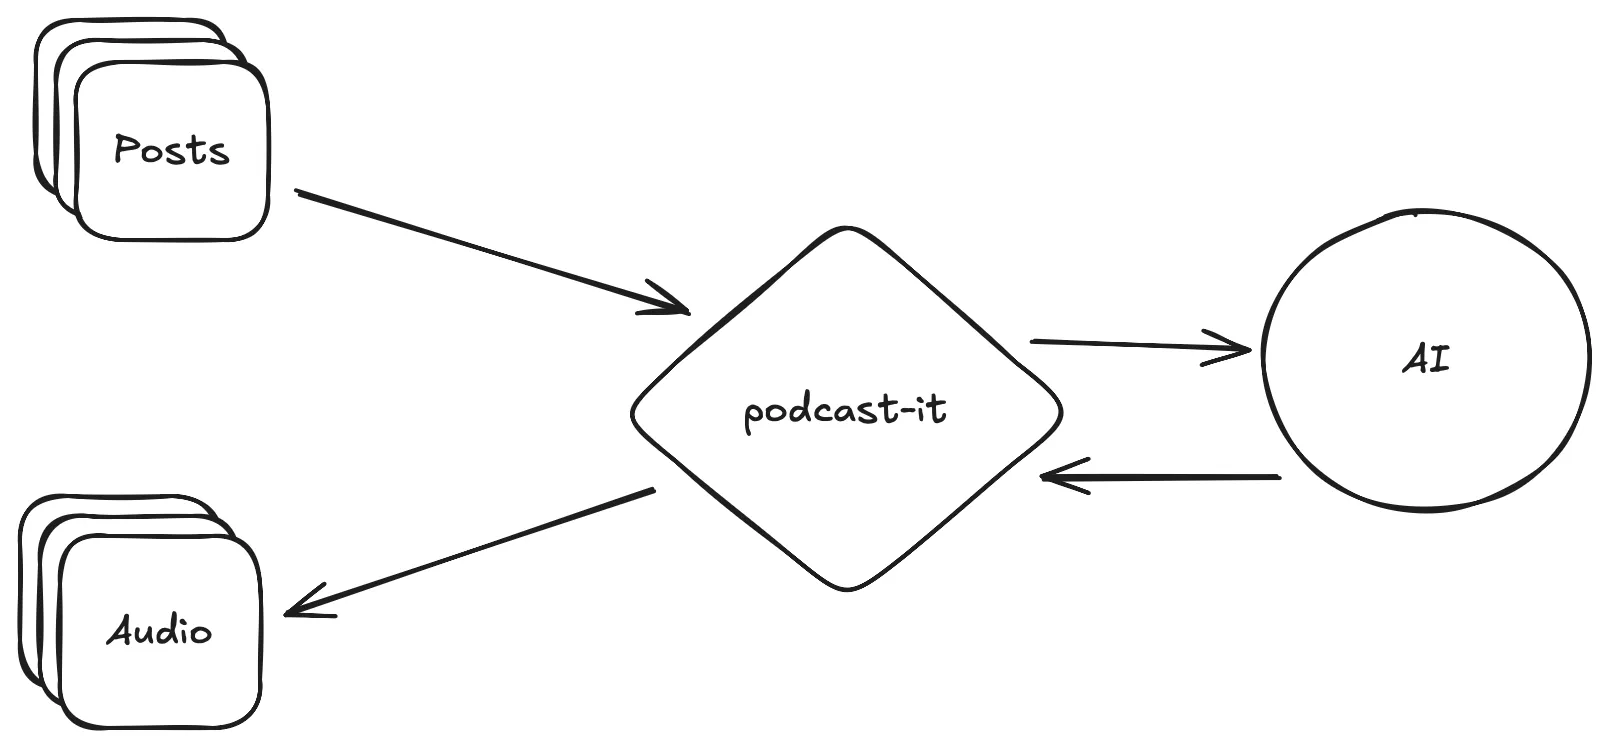
Here’s the high-level goal I started with:
Project Setup
Getting started with Workers was pretty simple. I started by reading up on their documentation, and then creating a copy of the backend API template using Hono + Chanfana + D1 + Vitest template. This template was useful because it provides an OpenAPI page, which is something I’m already familiar with and find quite useful for building REST APIs.
For reference, here’s the command I used:
npm create cloudflare@latest -- --template=cloudflare/templates/chanfana-openapi-templateAdditionally, I had to install the OpenAI SDK:
npm install openaiWith everything installed, I had to update the configurations in the wrangler.jsonc file. Specifically, I needed to add bindings for R2 and D1:
"r2_buckets": [
  {
    "bucket_name": "podcasts",
    "binding": "podcasts"
  }
],
"d1_databases": [
  {
    "binding": "DB",
    "database_name": "podcasts",
    "database_id": "da7da40e-c9ac-4115-8773-1dcdeb8f4635",
    "migrations_dir": "migrations"
  }
],
For this project, I also decided to remove the start command from the package.json, and just keep the npm run dev command. I also modified the dev command to use a new migrate command to make sure the database would be updated:
"migrate": "wrangler d1 migrations apply podcasts --local",
"dev": "npm run migrate && wrangler dev",
The migrate command applies the database scripts from the migrations/ directory. The directory holds SQL scripts which can be used to version how the database is built. See the D1 Migrations docs for more information. I was not using this approach when I first started the project, but I found it to be quite useful to have a way to build the database in the same way across environments.
Additionally, I had to make a tests/ directory since none existed when I first downloaded the template.
Once everything was set up, I would use the npm run dev to run the app and access the OpenAPI page at http://localhost:8787/.
Core Functionality: Text to Speech
For this project, I went with OpenAI for both script writing and audio synthesizing. Rather than reading raw blog text directly, I generate a narration script first and then convert it to audio. This makes the result sound more natural.
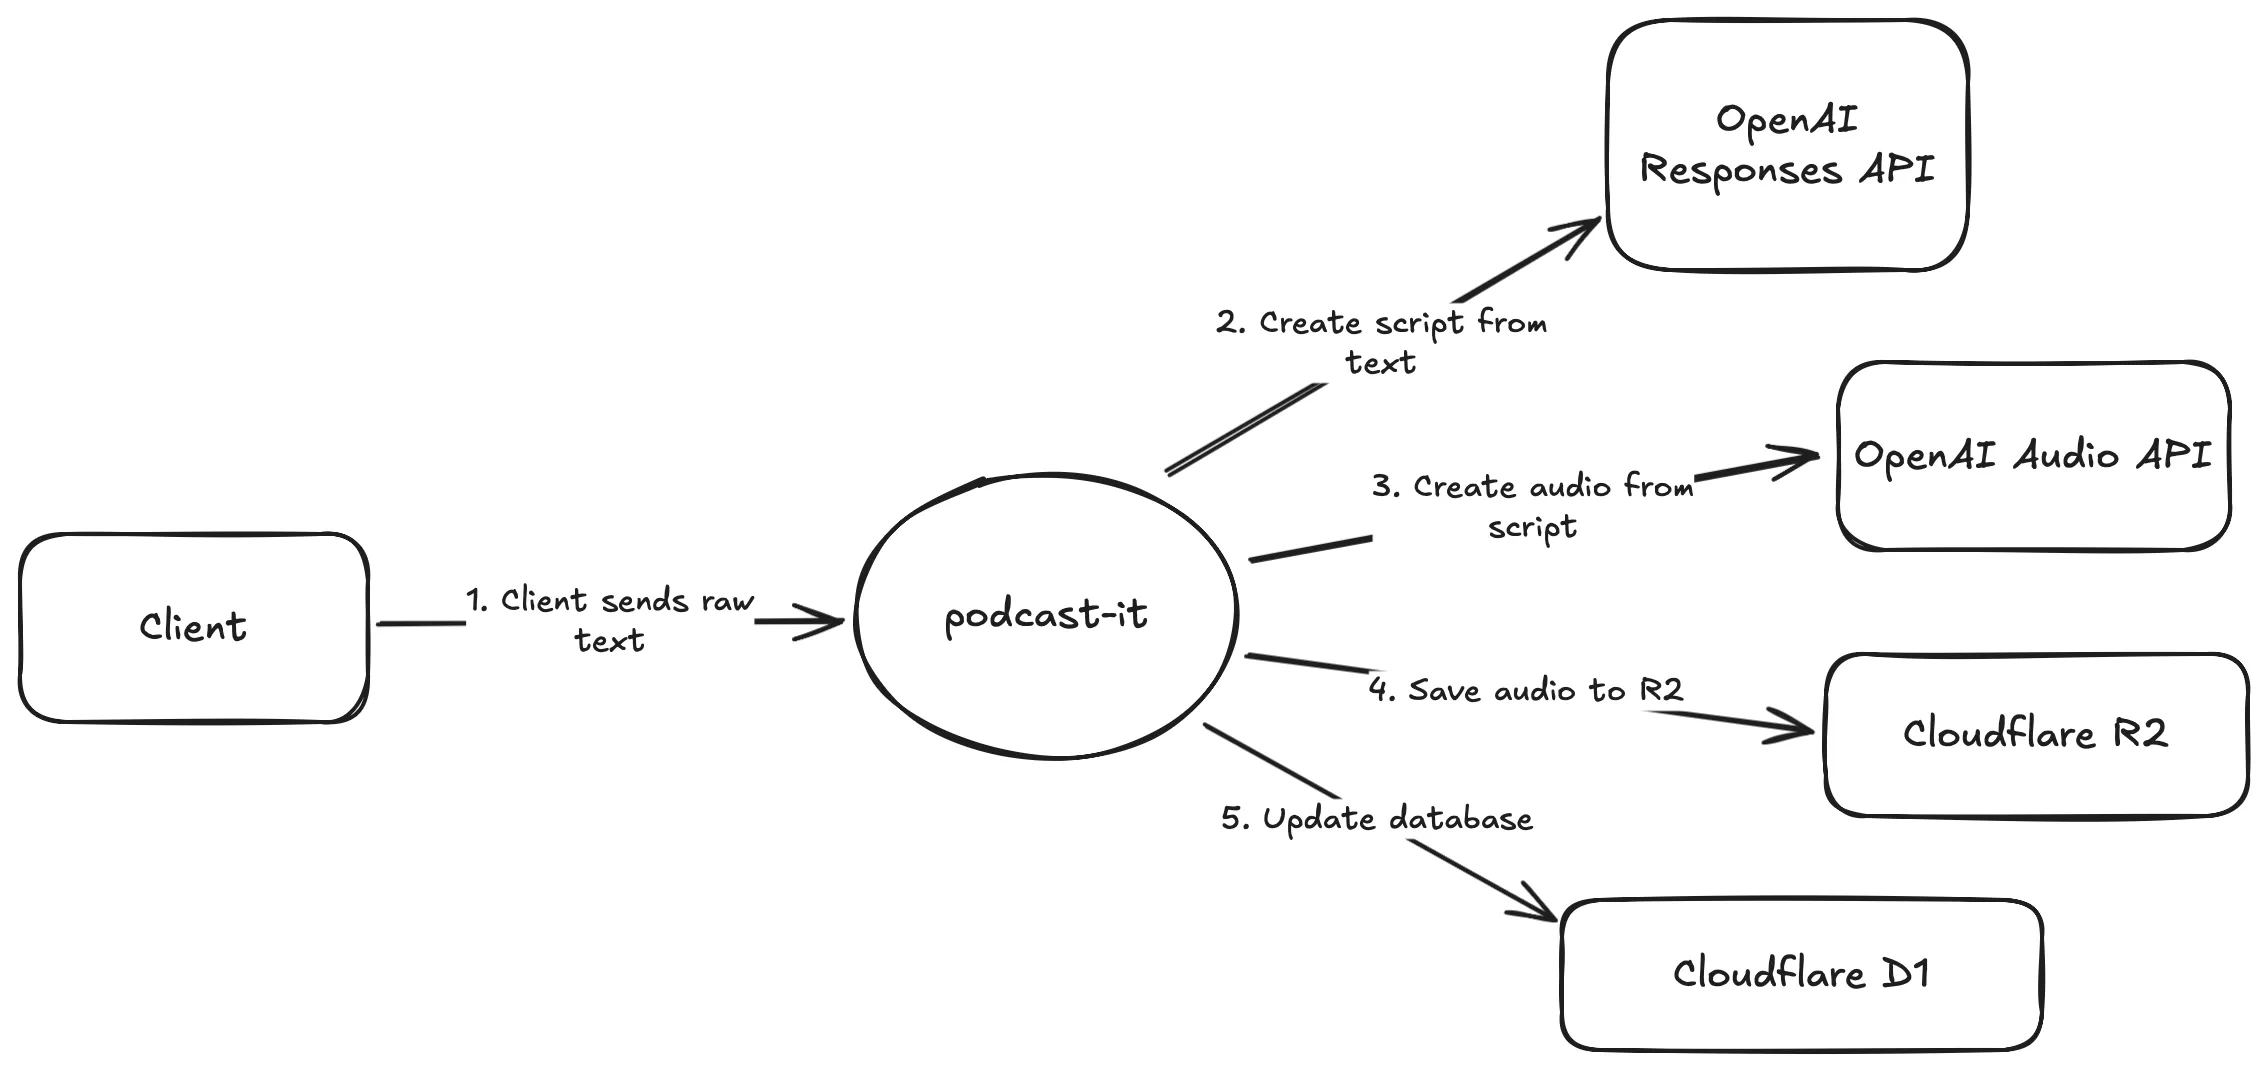
At a high-level, these are the components involved in creating the podcast episode:
Asynchronous Episode Creation
One key realization was that the episode creation endpoint needed to be asynchronous. Audio generation and storage can take several seconds, and blocking the request until everything finishes would create a poor experience. Instead, when the Worker receives a POST /api/episodes request, it immediately returns a response with a slug while the Worker continues processing in the background.
A companion endpoint, GET /api/episodes/:slug, returns the current status of that episode (e.g., pending, complete) along with metadata once the audio is complete.
Here’s what the episode creation looks like:
curl -X POST http://localhost:8787/api/episodes \
  -H "Content-Type: application/json" \
  -d '{
    "slug": "making-a-podcast-app",
    "content": "Today I will be talking about how I made a podcast generation app. First, lets talk about...",
    "hosts": [
      {
        "name": "string",
        "voice": "alloy"
      }
    ]
  }'
The response body just repeats back the details of the created episode and is returned with a 202 status code:
{
  "success": true,
  "episode": {
    "slug": "making-a-podcast-app",
    "content": "Today I will be talking about how I made a podcast generation app. First, lets talk about...",
    "hosts": [
      {
        "name": "string",
        "voice": "alloy"
      }
    ],
    "status": "pending"
  }
}
The 202 status code signals that the request was accepted but processing is not yet complete.
Internal Flow
The steps inside the Worker look like this:
- Receive a blog post as raw text.
- Use OpenAI to generate a narration script.
- Send that script to OpenAI’s text-to-speech API.
- Store the resulting audio in R2.
- Save metadata (status, timestamps, transcript) in D1.
- Update the episode’s status in D1 so the retrieval endpoint reflects the latest state.
Episode Retrieval
Now, to retrieve the episode using GET /api/episodes/:slug, the request looks like this:
curl -X GET http://localhost:8787/api/episodes/making-a-podcast-appWhen you retrieve an episode, the response reflects its current state. At first, it may look like this:
{
  "success": true,
  "episode": {
    "slug": "making-a-podcast-app",
    "audioFile": null,
    "status": "pending",
    "transcript": null
  }
}
Once processing finishes, it looks like this:
{
  "success": true,
  "episode": {
    "slug": "making-a-podcast-app",
    "audioFile": "making-a-podcast-app.wav",
    "status": "complete",
    "transcript": "{\"dialogue\":[{\"hostName\":\"string\",\"dialogue\":\"Hi everyone, today I’m diving into the process of building a podcast generation app.\"},..."
  }
}
In both cases, the response code is a 200.
Once the status is complete and the audioFile field is populated, the audio endpoint can be used to retrieve the actual audio:
curl -X 'GET' \
  'http://localhost:8787/api/audio/making-a-podcast-app.wav' \
  -H 'accept: audio/mpeg'
Storing and Serving Episodes
Episodes are stored across two layers. The audio files themselves are placed in R2 object storage, which provides cheap, scalable storage and allows the Worker to serve audio directly without worrying about persistence. Each audio file is stored using the episode slug as the key, so for example making-a-podcast-app.wav maps directly to /api/episodes/making-a-podcast-app. The metadata for each episode — including slug, transcript, timestamps, and current status (pending or complete) — lives in D1, making it easy for the retrieval endpoint to respond with structured JSON without embedding the actual audio.
When a client requests an audio file through GET /api/audio/:filename, the Worker streams the file directly from R2 back to the client. D1 is only ever queried for metadata, and R2 is only ever queried for raw binary audio. This separation of responsibilities turned out to be crucial. Without it, I would have had to encode audio as base64 in JSON responses, which would be slow and bloated. By splitting storage in this way, the Worker can serve fast metadata lookups while still delivering large audio files efficiently.
Here’s an example of downloading the audio file with curl:
curl -X GET http://localhost:8787/api/audio/making-a-podcast-app.wav \
  -H 'accept: audio/mpeg' --output making-a-podcast-app.wav
Testing the Worker
The integration tests exercise the real endpoints with OpenAI mocked. A few things they verify:
- A non-existent route returns 404 with the plain text body “404 Not Found”.
GET /api/episodes:- Returns 200 with an empty list when the table is cleared.
- After inserting one row directly into D1, returns 200 with a single episode whose
slug,status,audioFile, andtranscriptmatch the row.
POST /api/episodes(episode creation):- Mocks
openai.responses.parseto return a minimal dialogue andopenai.audio.speech.createto return a 64-byte audio buffer. - Returns 202 on creation.
- A subsequent
GET /api/episodes/:slugreturns 200 withstatus: "complete"andaudioFile: "<slug>.wav". GET /api/audio/<audioFile>returns 200 with binary audio; the byte length matches the mocked buffer and the first few bytes are identical.
- Mocks
- Duplicate creation is rejected:
- A second
POST /api/episodeswith the sameslugreturns 409 with the body “Conflict: episode already exists”.
- A second
The tests reset state where needed (e.g., deleting from Episodes before list assertions) and focus on observable behavior: correct status codes, payload fields, and that audio retrieval returns real bytes. There’s also a TODO to add an "error" status path in the database for failure cases.
Unfortunately, I did encounter some difficulties when trying to use Vitest with the Workers framework. Specifically, I was unable to create a __mocks__ directory, and I also found Vitest’s watch mode does not work with D1.
For the __mocks__ workaround, my test file has the following mock created at the top:
vi.mock("openai", () => {
  class OpenAI {
    constructor(_: any) { }
    get responses() {
      return { parse: responsesParse };
    }
    get audio() {
      return { speech: { create: audioCreate } };
    }
  }
  return { default: OpenAI };
});
As far as watch mode goes, there isn’t a workaround for me at the moment. I suppose I could try to create a mock D1 instance, but that would require more time than I want to invest in it. For those interested in these particular problems, I found the following issues had been reported on GitHub:
- Vitest watch mode and D1: https://github.com/cloudflare/workers-sdk/issues/9913.
- Vitest
__mocks__not working: https://github.com/cloudflare/workers-sdk/issues/7679.
Conclusion
Building podcast-it gave me a chance to explore Cloudflare Workers beyond static hosting and really stress-test R2 + D1 together. The biggest takeaway was how much simpler the architecture became once I split audio storage and metadata storage — trying to jam everything into one place would have been painful.
The project is still rough around the edges, but it’s already useful for quickly turning writing into audio. In a follow-up, I’ll show how to wire podcast-it directly into my site’s publishing workflow.
If you’d like to dig into the code or try it yourself, the repo is open source: github.com/h93xV2/podcast-it. Feedback, bug reports, and ideas are very welcome.