
Introduction
In a previous post titled Migrating My Blog from DigitalOcean App Platform to AWS Amplify, I expounded on my journey transitioning to AWS Amplify, shedding light on its multifaceted advantages, from cost-efficiency to robust site management. However, as time passed, an interesting trend emerged: I was updating the gallery on my blog with greater frequency than I was publishing new articles. This shift in content focus accentuated the necessity for automation in the update process. In this post, I’ll elucidate how I tapped into AWS Lambda, in collaboration with S3, to automate these gallery updates, providing a seamless solution for efficient visual content management.
Understanding AWS Lambda and S3
Amazon Web Services (AWS) offers an array of tools tailored for diverse developmental needs. Two such services, AWS Lambda and Amazon S3, are central to this discussion:
- AWS Lambda: A serverless compute service, Lambda allows developers to run code in response to certain triggers without necessitating the manual provisioning or maintenance of servers. Essentially, it’s designed to use computation resources on-demand, making it both cost-effective and scalable. You can learn more about AWS Lambda here.
- Amazon S3 (Simple Storage Service): A storage solution provided by AWS, S3 is renowned for its scalability, data availability, and security. For the context of this article, S3 is where the blog’s gallery images are stored, and any modifications to its content can act as a trigger for AWS Lambda. You can learn more about Amazon S3 here.
By combining the event-driven nature of AWS Lambda with the storage capabilities of S3, it’s possible to develop an automated system that responds efficiently to changes, such as gallery updates. This synergy forms the backbone of the solution we’ll explore in the subsequent sections.
The Need for Automation
As my interaction with the gallery section of the blog intensified, the frequency of image updates began to eclipse the posting of new articles. This unusual yet intriguing shift in my content management activities spotlighted an area ripe for optimization—automating the process of updating the gallery.
Despite the vast functionality and flexibility AWS Amplify offers, each gallery update necessitated manual action to ensure the changes were reflected on the live site. Specifically, after changing the images in the bucket, I would have to manually start a new build in the Amplify console. This manual process, albeit straightforward, demanded time and attention that could be more productively allocated to content creation or other development tasks.
Given the frequent nature of these updates, the implementation of an automated system became not just an option for increased efficiency but an essential evolution in the blog’s management. An automated process would allow for immediate reflection of changes in the live gallery without requiring manual intervention, optimizing the use of resources and paving the way for a more streamlined content update mechanism.
Implementing the Solution
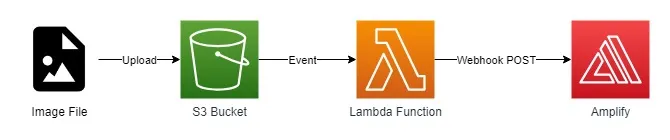
In the above diagram, you can see a rough outline of how this solution works. The diagram specifically shows the flow of events which occur when an image is uploaded to S3, but the process for deletion is essentially the same. In the diagram, you can see the following steps:
- An image is uploaded to the S3 bucket.
- The S3 bucket triggers an event which invokes the Lambda function.
- The Lambda function makes a request to the Amplify webhook URL, which triggers a new build.
Configuring the S3 Bucket
For this project, I ended up creating a folder inside my S3 bucket called gallery. This folder contains all the images that are displayed in the gallery section of my blog. The images are stored in the bucket, and the gallery section of the blog is configured to pull the images from the bucket.
The reason for this setup is I wanted to be able to potentially use the S3 bucket to store other site assets in the future. By creating a folder for the gallery images, I can easily add other folders for other assets, such as images for blog posts or other site assets. Additionally, this setup allows me to create separate AWS Lambda functions for each folder, which is useful if I want to add different functionality to different folders. As far as the new automation flow is concerned, the gallery folder is part of the triggering mechanism used to invoke the Lambda function which restarts Amplify.
Generating the Amplify Webhook URL
With AWS Amplify, one can generate a webhook URL which will trigger builds when POST requests are made to it. To create the URL, I took the following steps:
- Navigate to the Amplify console.
- Select the app for which you want to create the webhook.
- Click on the “App settings” dropdown from the menu on the left side.
- Click on the “Build settings” option.
- Scroll down to the “Incoming webhooks” section.
- Click on the “Create webhook” button.
- Enter a name for the webhook. I named mine “s3Trigger”.
- Select the branch you want to trigger builds for. I selected the “main” branch.
- Click on the “Save” button.
Once the webhook is created, you can copy the URL and use it to trigger builds, or you can test it by copying and running the cURL command provided in the console.
Creating and Linking an AWS Lambda Function
To complete the automation, I created a Lambda function that is triggered by changes to the S3 bucket. The function is written in JavaScript and makes a request to restart the Amplify build process. The code for the function is as follows:
console.log('Loading function');

const https = require('https');
const url = require('url');

exports.handler = async (event, context) => {
    const eventName = event.eventName;
    const bucket = event.Records[0].s3.bucket.name;
    const key = decodeURIComponent(event.Records[0].s3.object.key.replace(/\+/g, ' '));
    const params = {
        eventName,
        bucket,
        key,
    };

    console.log(JSON.stringify(params));

    try {
        const webhookUrl = process.env.AMPLIFY_WEBHOOK;

        const response = await postRequest(webhookUrl);
        console.log("Webhook Response:", response);

        return {
            statusCode: 200,
            body: 'Webhook triggered successfully!'
        };
    } catch (error) {
        console.error('Error:', error);
        return {
            statusCode: 500,
            body: 'Failed to trigger the webhook!'
        };
    }
};

function postRequest(url) {
    return new Promise((resolve, reject) => {
        const parsedUrl = new URL(url);

        const options = {
            hostname: parsedUrl.hostname,
            path: parsedUrl.pathname + parsedUrl.search,
            method: 'POST',
            headers: {
                'Content-Type': 'application/json'
            }
        };

        const req = https.request(options, (res) => {
            let responseData = '';

            res.on('data', (chunk) => responseData += chunk);
            res.on('end', () => resolve(responseData));
        });

        req.on('error', (error) => reject(error));
        req.end();
    });
}
The function is triggered by changes to the S3 bucket, and it uses an Amplify webhook URL to restart the build process. The webhook URL is stored as an environment variable in the Lambda function called AMPLIFY_WEBHOOK. This is done to ensure that the webhook URL is not exposed in the code. The webhook URL is stored in the Lambda function’s environment variables, which are encrypted at rest and in transit. This ensures that the webhook URL is not exposed in the code.
Concluding Thoughts
As content creators, we are constantly exploring ways to optimize our work processes. Automating tasks that are frequent and repetitive, such as updating a gallery, significantly contributes to this endeavor, allowing more time and resources for tasks that require our creative and strategic inputs.
In this article, I have outlined the process of leveraging AWS Lambda and S3 to automate the updates to my blog gallery. By doing so, I’ve successfully managed to minimize manual intervention, streamline content management, and optimize the use of resources.
It’s noteworthy that AWS services’ flexibility and interoperability have enabled this automation, underscoring the vast potential these tools hold for creative projects. I encourage fellow developers and content creators to consider integrating such automations into their workflows. It’s not just about saving time—it’s about channeling our resources where they truly matter.
As I continue to explore the vast potential of AWS services, I’m excited to see how I can leverage them to further optimize my content creation and management processes. On the topic of serverless Lambda functions, Amplify Studio allows for the creation of a complete backend. While my current approach did not make use of Amplify Studio, I am going to be looking more to it in the future to build more complex features for this blog.