Introduction
In the ever-evolving landscape of web development, one area that often gets taken for granted is the organization and presentation of content through tagging. Tags, though small and seemingly straightforward, play a pivotal role in how users navigate and understand a website. Inspired by the approach of dev.to, I embarked on a journey to enhance the tag system on my own website. The simple yet impactful addition of descriptions to each tag aims to provide a clearer, more intuitive user experience. This blog post delves into the journey of implementing this feature, the challenges faced, the solutions crafted, and the expected impact on user experience. Whether you’re a fellow developer, a content creator, or just someone interested in the nuances of web design, I invite you to explore the process and insights gained from this enhancement.
Before this enhancement, the tag page was functional yet lacked informative context, making navigation less intuitive for new visitors.
Enhancements to Blog Tags
Recently, I came across the tags page on dev.to and was inspired by their approach of including descriptions for tags. This got me thinking about implementing a similar feature on my own website. Adding descriptions as tag metadata would greatly help new visitors understand the relevance of a given tag to a post. For example, a post tagged with aws might be unclear to some, but a brief description can immediately clarify that it’s related to Amazon Web Services.
Given the simplicity of my site, I decided to initially limit the metadata to just descriptions. This decision was to ensure the design remains uncluttered, particularly since this metadata would be visible on pages listing posts under each tag. Laying a solid foundation first seemed crucial before adding more complex features.
Now, let’s dive into how I implemented this feature.
Implementing Tag Metadata with JSON
Since this is a statically generated site, I had to put some thought into how I can store metadata for the tags inside of the source code for the site. I could have used a database, but the solution I ended up going with was to use JSON files to store metadata for the tags. The primary reason for me making this decision was cost minimization. Cost meaning time and money. Databases usually cost money. There are some free solutions, but then the site build process would be tied to a database.
The time to develop a solution that connects to a database seemed a bit prohibitive since it would add additional steps to the post writing process. For example, I would have to connect to the database to write updates for tags. Builds would also require a network connection, so working on the site without an internet connection would require mocking the data. I already have that problem with the photo gallery, so I didn’t want to continue down that path for now. All things considered, JSON is pretty flexible so I could adapt the site data to a database later on if needed.
After making the decision to commit to JSON files, I subsequently decided each file would contain an object with the fields "name" and "description". Here’s a concrete example of a tag file called amd.json:
{
  "name": "amd",
  "description": "A chip manufacturer that creates CPUs and GPUs. AMD stands for Advanced Micro Devices."
}
To connect the data in the tag files to the tags themselves, I had to add this Gatsby plugin called gatsby-transformer-json. Once installed, I had to make the following update to the gatsby-config.js file:
//...
module.exports = {
  //...
  plugins: [
    //...
    {
      resolve: `gatsby-source-filesystem`,
      options: {
        path: `${__dirname}/content/tags`,
        name: `tags`,
      },
    },
    //...
  ]
}
This allows me to store the tag files in the local project directory content/tags and then read the JSON content of those files so that it’s accessible through Gatsby’s GraphQL system during builds.
For the tags page, I added the following fragment to the GraphQL query:
allTagsJson {
  edges {
    node {
      description
      parent {
        ... on File {
          name
        }
      }
    }
  }
}
Next, I updated the component code to build out a tag map that connects the name of tag (through the file name) to the tag’s description. Then it updates the tag objects to have the description:
const tagMap = new Map()

data.allTagsJson.edges.forEach(element => {
  tagMap.set(element.node.parent.name, element.node.description)
})

const allTags = data.allMarkdownRemark.group

allTags.forEach(element => {
  element.description = tagMap.get(element.fieldValue)
})
For the individual tag pages, I use templates. I updated the template GraphQL query to include the following fragment:
allTagsJson(filter: { name: { eq: $tag } }) {
  edges {
    node {
      description
    }
  }
}
Unfortunately, I’m not able to filter the tags using the file name. This is where the "name" field comes in. The "name" field allows me to filter out all the other tags. I’m able to then read the tag description as follows:
const tagDescription = data.allTagsJson.edges[0].node.description
Drawbacks and Advantages
While this solution has been effective, it’s important to consider both its advantages and limitations.
There are some drawbacks to this solution:
- If a new tag is created, a new metadata file will have to be created. This is a little too difficult to automate right now, so it’s something I’ll just have to remember.
- These tag files take up repository space. As the number or size of the tag files grow, the project size grows.
- The
"name"field has to match the file name. It may be simpler to eventually update the code to only use the"name"field.
The main pros were:
- It was simple to implement which allowed me to deploy the feature quickly.
- JSON is flexible. It will be easy to add new fields later, and I could always store it in a database in the future.
Improvements to the Tag Page Layout
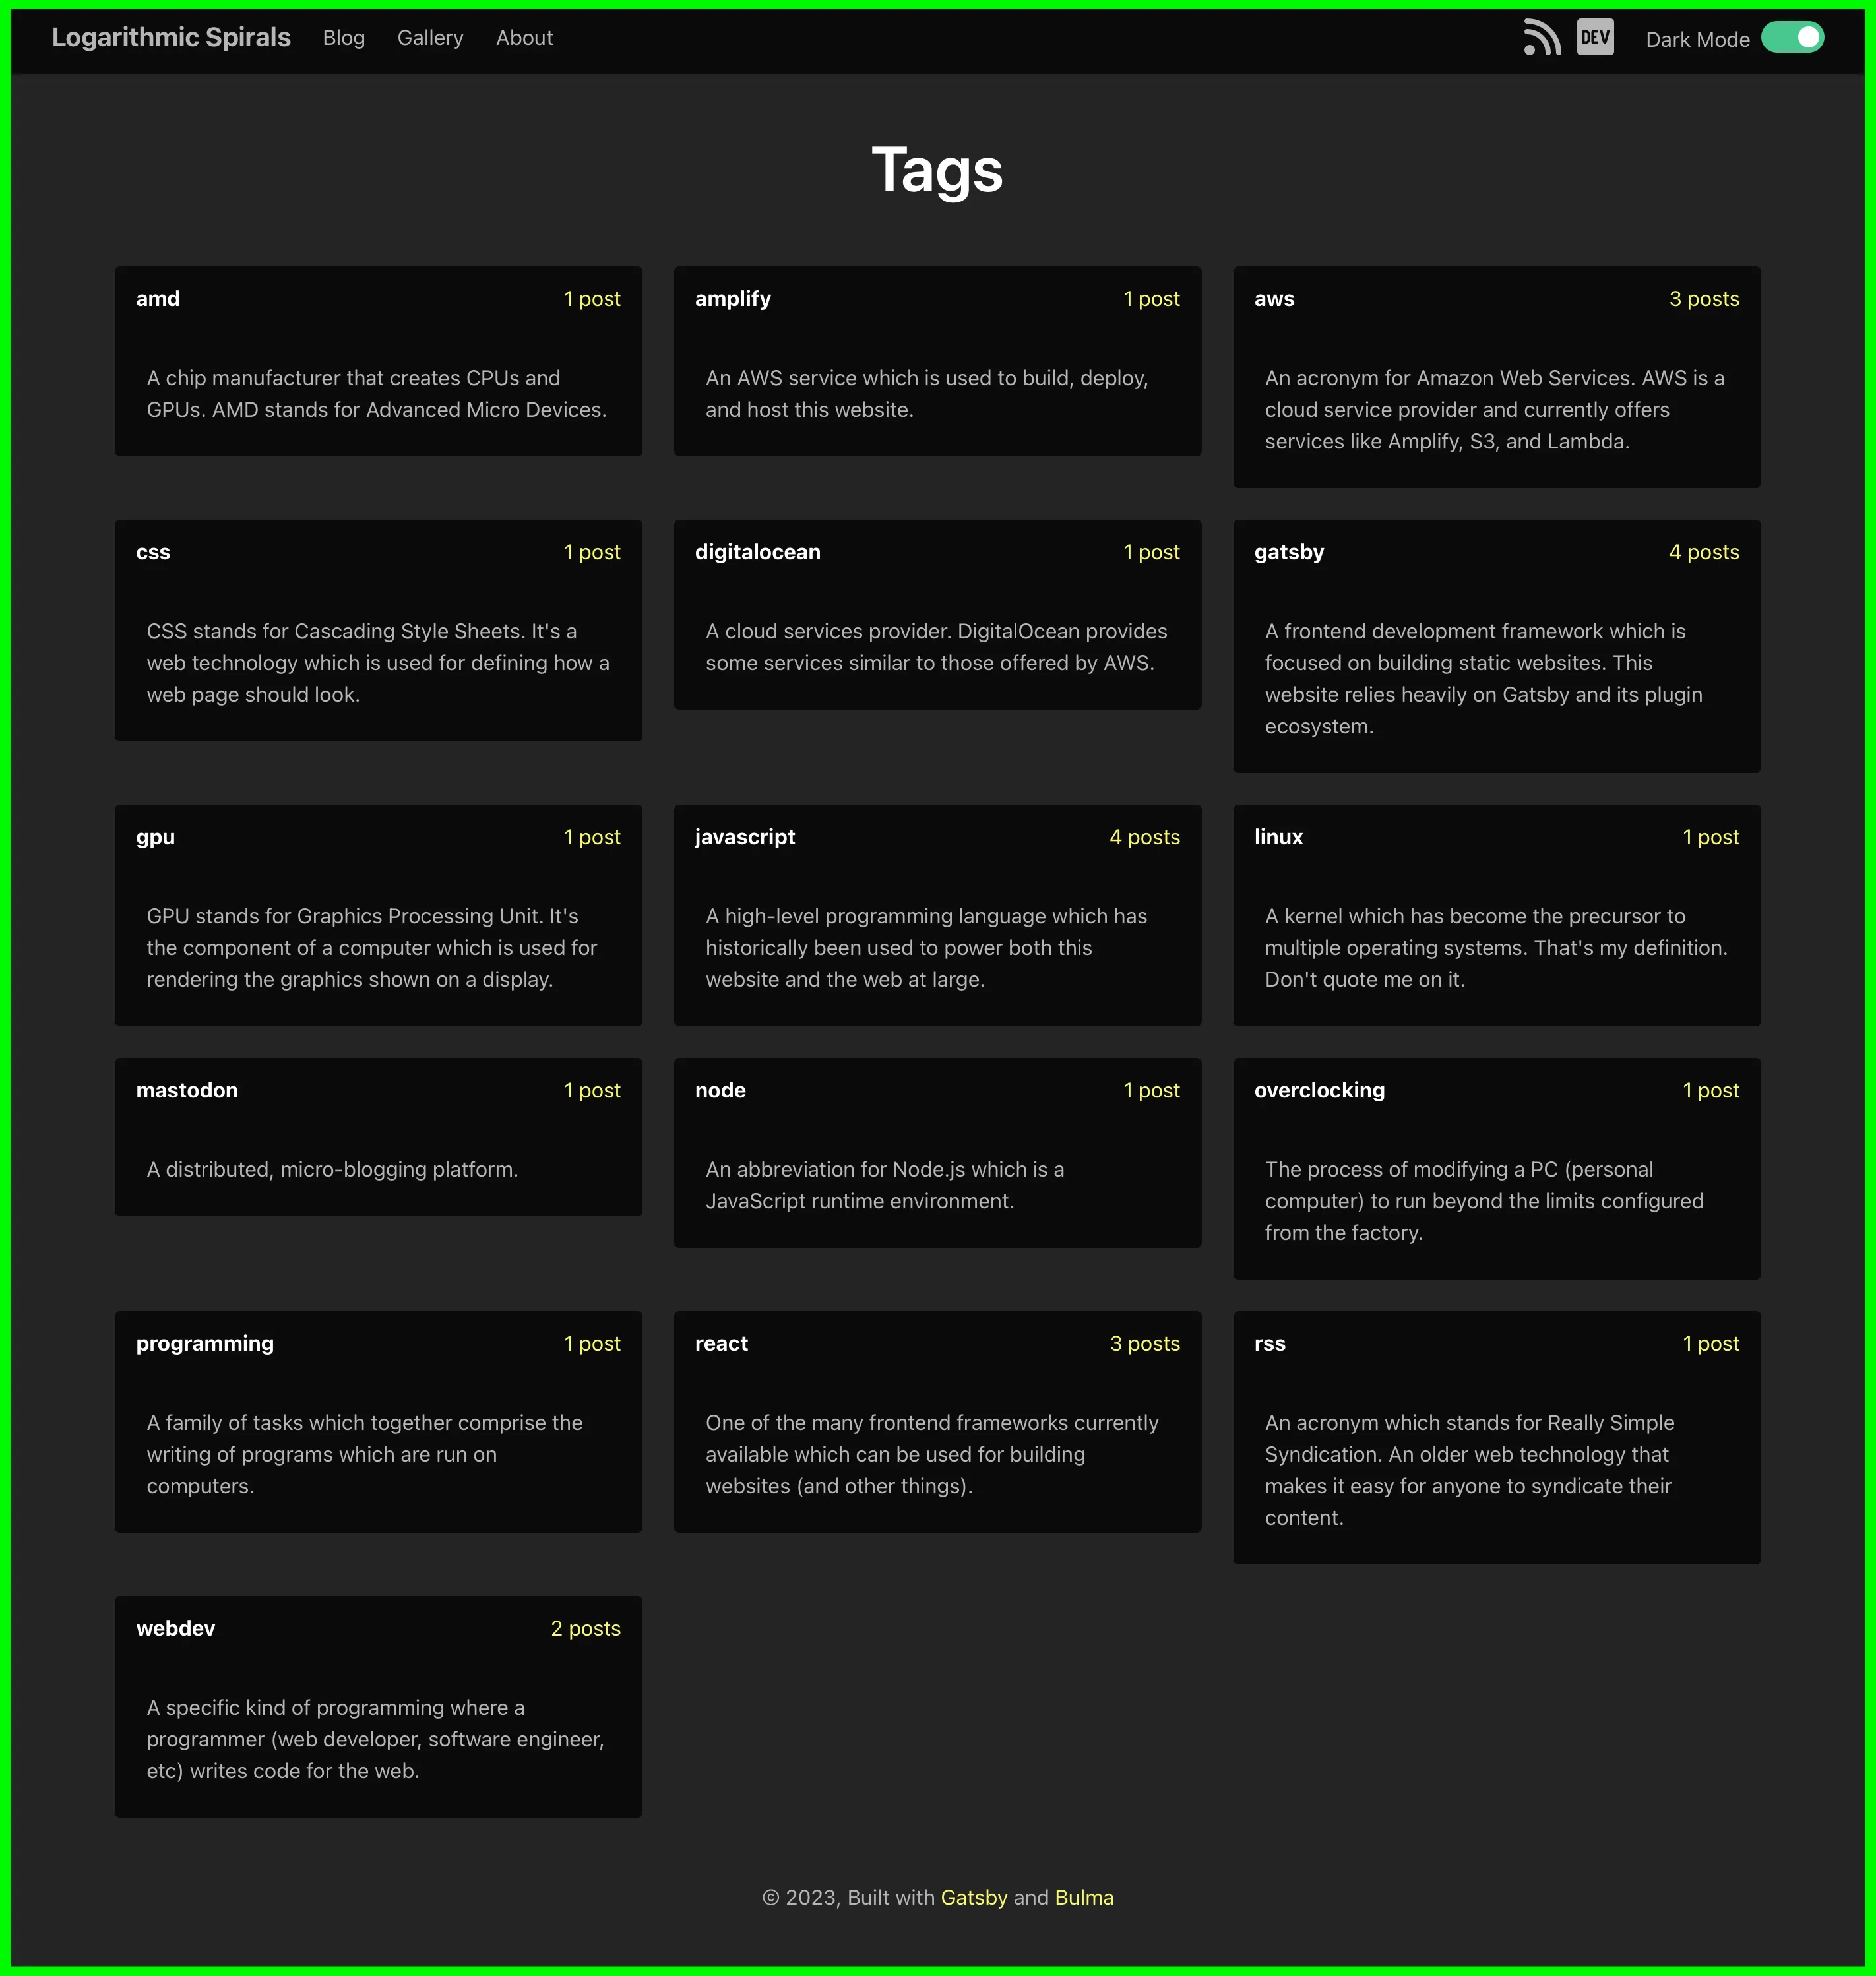
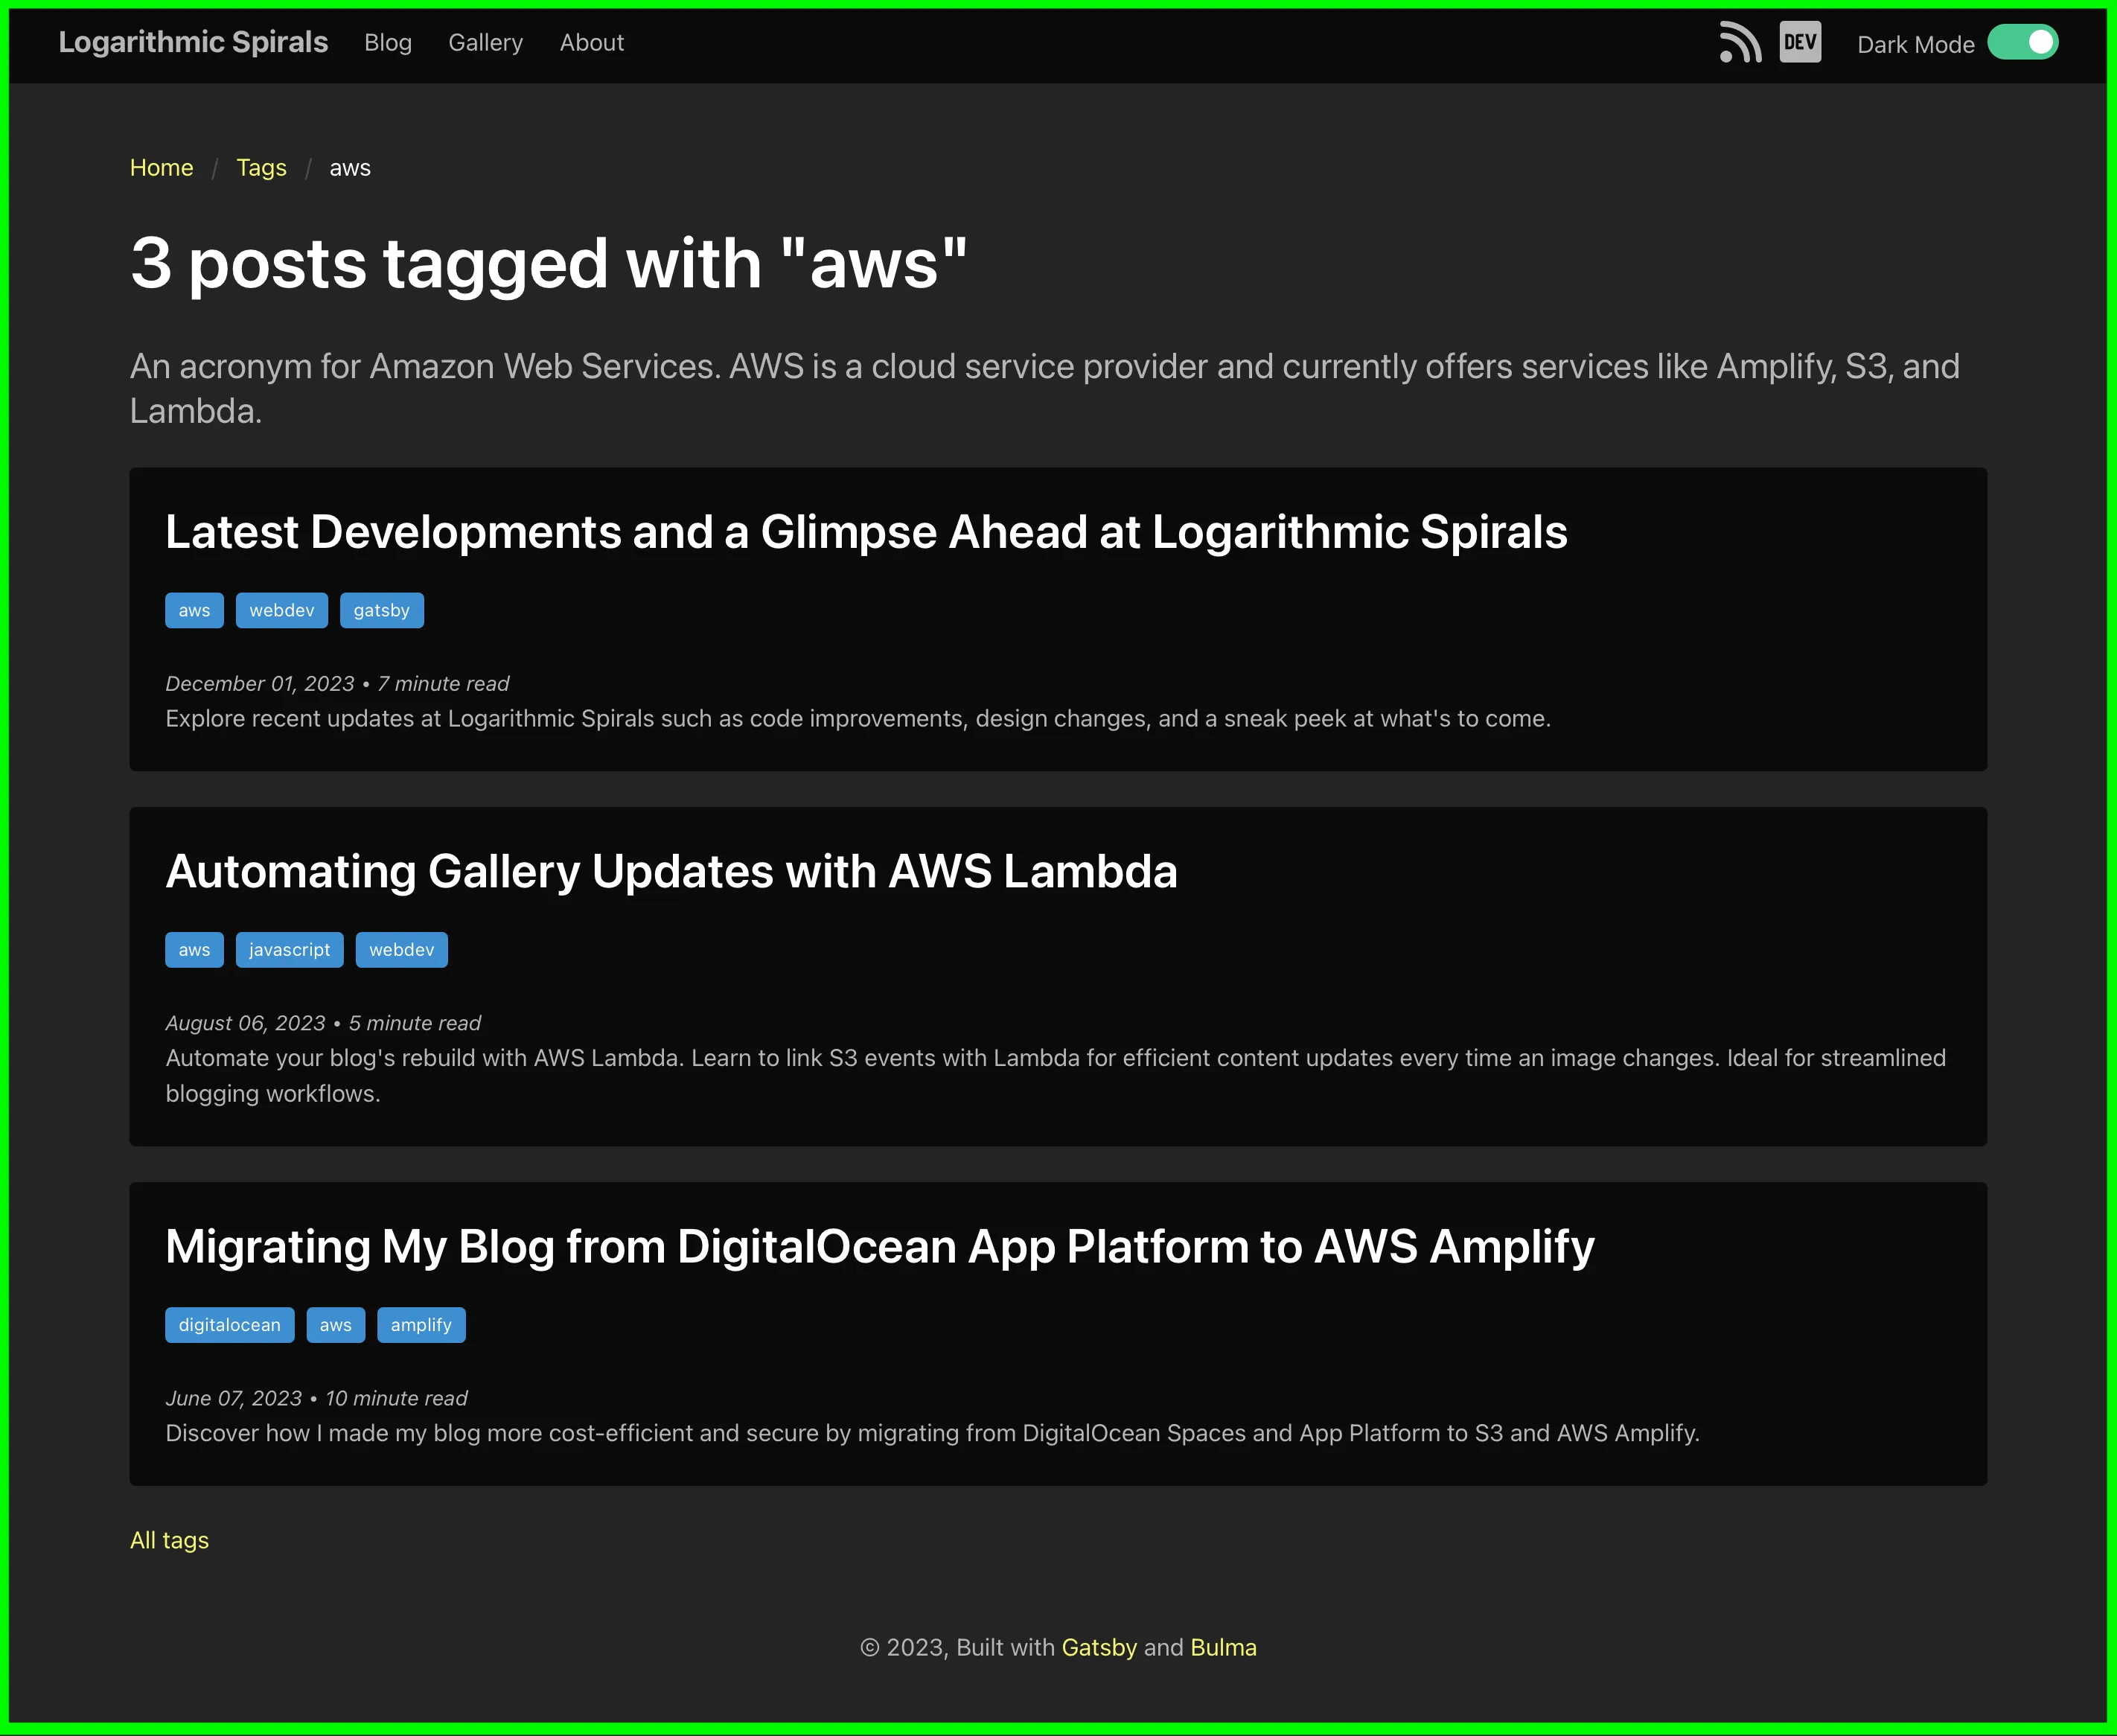
After establishing the underlying data model for tag metadata, I proceeded to implement changes to the tag pages. The site has a page which lists all the tags and individual pages for each tag. Before making these improvements, the tags page simply showed all the tags used on the site as well as a count indicating the number of tagged posts. Clicking on a tag would take someone to the individual tag page which showed a preview list of the tagged posts.
With the new metadata, I was able to add the tag descriptions to all of these pages. Below you will see some screenshots showing the new descriptions. To better illustrate these improvements, here are some screenshots showing the new descriptions on the tag pages:
Screenshot: The updated tags page featuring tag descriptions.

Screenshot: An individual tag page (AWS) with its detailed description.

Intended Impact on User Experience
There are several benefits which prompted the creation of a metadata system for tags on this site:
- Improved Navigation and Usability: The inclusion of descriptions is intended to help make it clearer for visitors why a post has a given tag. If a visitor clicks on a tag after reading a post, they’ll be able to see the description and other tagged posts. Hopefully, a visitor who likes a post with a given tag will now find it easier to look for similar posts on the site.
- Educational Value: Visitors who are not familiar with the meaning of a specific tag will now hopefully find an opportunity to learn something new when they click on a tag. For example, a visitor who is unfamiliar with AWS may now click on the
awstag and learn that it stands for Amazon Web Services. - Better Content Organization: While not directly beneficial to visitors, the tag descriptions make it easier for me to consider how a post is tagged. Previously, I kept the idea in my head. The act of writing out the description makes it easier for me to maintain consistency and appropriately tag posts. The implicit benefit to visitors is they will find the tagging system to be more accurate and precise as the content continues to grow.
- Aesthetic Appeal: These descriptions have helped to influence design enhancements which are already contributing positively to the site’s aesthetic quality. As time moves forward, further metadata enhancements could lead to more high-quality improvements to the site’s look and feel.
- Enhanced SEO: Descriptive tags can improve this blog’s Search Engine Optimization (SEO). The individual tag pages can be crawled by search engines, which can help potentially lead to the blog ranking higher in search results for related queries.
While I currently don’t measure audience feedback, at some point I could implement tracking to better understand how these changes impact user engagement. With that being said, these changes are essentially driven by my own opinions about what a good user experience for a website should be.
Conclusion
The journey of enhancing my website’s tag system with descriptions has been both challenging and rewarding. By choosing a JSON-based approach for metadata storage and utilizing Gatsby’s powerful capabilities, I have managed to create a more informative and user-friendly tagging system. While the process revealed some limitations and considerations for future improvements, the benefits in terms of navigation, educational value, content organization, and aesthetic appeal are undeniable. As I continue to evolve and refine my site, these tag enhancements mark a significant step towards a more engaging and user-centric experience. This endeavor, driven by my vision of an ideal user experience, serves as a testament to the continuous pursuit of improvement in the digital world. I look forward to seeing how these changes resonate with my audience and am excited about the potential for further advancements in the future.